Soccer Dribbling Drills – Improve how you Dribble the Ball

Basic Soccer Cone Drill
The Soccer Cone Drill is used to develop control, speed, and agility with the ball. It improves your ability to change direction with the ball quickly.
Instructions:
- Line up 5 or 6 cones in a straight line about 4 metres apart
- Dribble the ball with the inside of your feet while weaving in and out of the cones
- Circle the last cone while still dribbling the ball and weave back through the cones to where you began
- Now repeat the drill using the inside out outside of both feet
_____________________________________
Dribbling Conditioning Patterns
Description:
Players pair up and alternate dribbling, at full speed, through a series of patterns. The patterns involve turning, cutting, and running around four cones with the ball to improve players’ ball control. This activity can be used as a functional fitness drill as well when the time and intensity is increased.
Key Skill Focus: ball control at high speeds, dribbling, change of direction, and fitness (optional).
Age Suitability: U10 to U18
Equipment: cones and soccer balls.
Setup:
- Players partner up with one ball and four cones.
- Each pair of players spreads out across the field and sets up their four cones.
- The four cones will be set up as two cone gates about 8-12 meters away from each other. The gates should be 2-3 meters wide and should be immediately across from each other.
- One player works while the other rests. The first player working will start with the ball behind one of the gates.
- Decide on a time limit that the players will work. 30-60 seconds is the range that the players should work for each round. Increase the amount of time players work to add an element of fitness to the activity.
Instructions:
- The first player in each pair starts dribbling on the coach’s command. The player dribbles through the gate they are standing behind and then continues towards their other gate.
- The player dribbles through the middle of the other gate, and then turns with the ball outside of the gate 180-degrees, and then starts dribbling back towards the middle of the first gate to repeat the same process.
- The player working dribbles as quickly as possible during the duration of the round while their partner rests.
- As soon as the coach gives the signal that the first-round time is up, the first player gives the ball to their partner who immediately begins dribbling around the four cones, repeating the same process.
- Continue this process for as many rounds as desired. 8-12 rounds per player is a good starting reference. Mix up the dribbling patterns so players work on different dribbling techniques. See variations for all the techniques that can be achieved using this setup.
Variations:
Original pattern – Use the original pattern described above, but have players use only their left foot for one round, and then have them use only their right foot for the next round. Have players use both feet for the third round.
Cuts (as shown in the diagram) – Players can work on their change of direction cuts in this activity. Rather than dribbling through and around the gates, players perform a 180-degree cut with the ball in between their two gates. Players should work on cutting the ball with the inside, outside, and bottom of their feet.
Vary the workload – Depending on the amount of fitness needed, or the players’ fitness levels, increase the number of time players works per round and the total number of rounds.
Vary the cone distance – Increase the distance between gates to increase the distance covered by the players. This will result in fewer turns, but faster dribbling and deceleration.
Coaching Points:
- Challenge the players to dribble at full speed. This will increase the players’ abilities to control the ball under that speed while also getting the most out of the activity fitness wise.
- Remind the players to keep the ball close while dribbling so that they can change directions quickly with the ball. Players should take short, quick touches when turning around the cones, but then should take bigger touches that get out in front of their bodies when dribbling to the next gate to get up to speed faster.
- Encourage the players to use both feet when practicing the turns and cuts around the cones.

_____________________________________
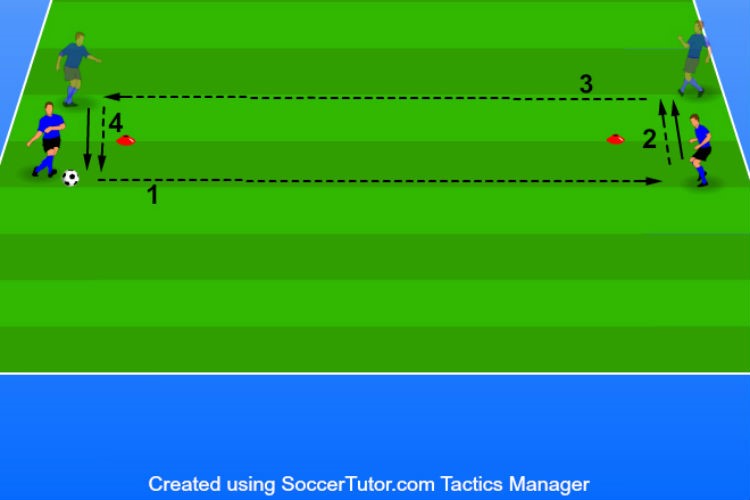
Dribbling Shuttles with Cuts
Description:
Players dribble to the first cone line, back to the start, to the second cone line, back to the start, and then finally to the third cone line and then back to the start. Players must make a quick, 180-degree cut at each line and attempt to complete the pattern as quickly as possible while maintaining full control of the ball.
Key Skill Focus: dribbling, change of direction, cuts, and ball control.
Age Suitability: U8 to U12.
Equipment: cones and soccer balls.
Setup:
- Set up four, parallel cone lines with five meters of space between each cone line. Place cones between the two end cones to create alleyways for the players to dribble down.
- Divide the players into groups of 3-5 players and assign each group to an alleyway.
- If there are more than five players per line, create more alleyways to decrease the number of players per line.
- Each player should have a ball at their feet if possible. If there are not enough soccer balls present, make sure the first player in each line has a soccer ball then.
Instructions:
- On the coach’s command, the first player in each line dribbles to the first cone line in front of them.
- Once the soccer ball arrives at the first cone line, the players cut the ball and turn 180-degrees and dribbles back to the start line.
- When the players arrive at the starting line, the players turn/cut, and dribble to the next cone line, ten meters away.
- After the ball reaches the second cone line, players turn/cut, and dribble back to the starting line.
- At the starting line, the players change direction and dribble to the farthest cone line, then back to the starting line, where they finish their turn.
- The next player in line starts their turn once the player in front of them dribbles across the finish line. The next player in line repeats the same pattern as the player in front of them.
- Players will complete one, two, or three trips per round depending on the players’ age, skill, and fitness level. Make sure the players get the proper amount of rest between each trip.
Variations:
Competition – The first group to get all their players through, one at a time, wins that round.
Weak foot – Have the players complete the pattern using only their week foot.
Various dribbling techniques – Give the players specific dribbling and cutting rules. Only inside, outside, right, left, etc.
Various turns and cuts – Teach the players different turns, or cuts, to perform at each line. Inside the foot cut, outside the foot cut, bottom of the sole turn, etc.
Fitness – This activity can be used to build players’ fitness levels while also getting touches. Teams must complete two, three, or four rounds before resting.
Coaching Notes:
- Challenge the players to push themselves to dribble as quickly as possible while maintaining control of the soccer ball. This will help players develop their dribbling and turning skills at a higher speed.
- Teach the players different turning methods and help them become efficient at them to increase their dribbling and turning speed.
- Unless this is being used a fitness activity, give players plenty of rest between each of their trips to ensure they are focusing on dribbling and turning at high speeds instead of their tired legs.
- Use smaller distances for younger, less experienced players. Use larger spaces for older, or more experienced players.
- Educate the players to take larger touches to cover more ground and smaller touches when a change of direction is needed. The varied distances are important for players to find the type of touch they need between each line.
- Remind the players to look up between touches. This builds good awareness habits and will help players and their vision in games.
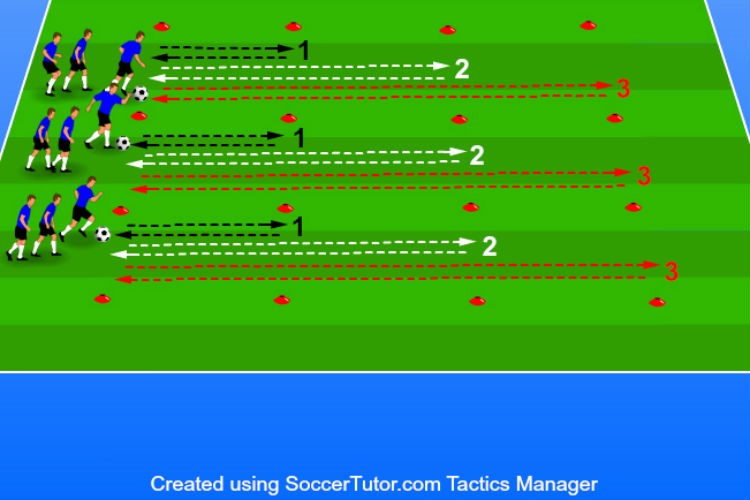
Head Up Dribble Race – Dribbling Drill
Description:
Two teams compete against each other through a series of cone gates. Players must look up and avoid their opponent as they cross from one cone line to the other. After dribbling through the cone gates, the players will dribble back to the starting line before the next player in each line begins their turn.
Key Skill Focus: dribbling, ball control, awareness, and change of direction.
Age Suitability: U10 to U15.
Equipment: cones and soccer balls.
Setup:
- Setup two, parallel lines of six cones (three gates) with by 8-12 meters in between each cone line. Increase, or decrease, the space between the two lines depending on the players’ skill and age.
- Two different sets of colored cones are needed. Red and yellow will be used for this example. One line should be the following: red gate, yellow gate, red gate. The other line should be the opposite: yellow gate, red gate, yellow gate.
- Place two cones three meters away from each cone line to indicate the starting point for each team. See diagram for more setup information.
- Divide the players into two, evenly numbered teams and assign each team to form a line behind each of the starting cones.
- Tell each team which colored gates they will be dribbling through. One team will only dribble through the red gates while the other team will only dribble through the yellow gates.
- The player at the front of each line needs a soccer ball.
Instructions:
- On the coach’s command, the first player in each line dribbles through their first assigned colored gate as quickly as possible.
- After dribbling through their first gate the players then cross over to the other cone line to dribble through their next assigned colored gate.
- The players dribble through all three of their colored gates and then dribble down the middle of the two cone lines back to the starting line as possible (see diagram below for more pattern information).
- The players stop the ball on the starting line for the next player in line to begin their turn and repeat the same process as the first player.
- The first team to get all of their players through the course, one at a time, wins the round.
- Play as many rounds as needed.
Variations:
Weak foot – The players can only complete the course using their weaker foot.
Various dribbling techniques – Give the players a specific foot part they must use to dribble. Inside, outside, bottom, etc.
Size – Increase the distance between gates to force players to work on dribbling over longer distances.
More gates – Add more gates to increase the distance players must dribble for each turn. Have four, five, or six gates to challenge players and work on fitness.
Coaching Notes:
- Challenge the players to dribble as quickly as possible while keeping the ball under control. Players should be encouraged to test themselves and go out of their comfort zone to improve.
- Teach the players to take bigger touches in the open field, and then smaller touches when getting around the gates. Taking bigger touches allows players to cover more ground faster, while smaller touches allows players to turn more quickly.
- Remind the players to keep their eyes up in between touches. This will help players avoid colliding as they cross over to their other gate and help them build good awareness habits.

__________________________________________________________________________________
Soccer Receiving/Trapping Drills – Improve how you trap the ball
Trapping from a thrown ball

This drill allows the player to practice the same type of trapping over and over again as a partner throws the ball to the same position each time.
- Two people stand 3-4 m apart facing each other
- The Throwing player throws the ball to the feet of the Receiving player who traps the ball with their feet
- Once the ball is under control it is kicked back to the Throwing player so the drill can be repeated
(Note: This drill can be performed with the feet, thighs, chest or head)
__________________________________________________________________________________
Soccer Passing Drill – Improve how you pass the Ball
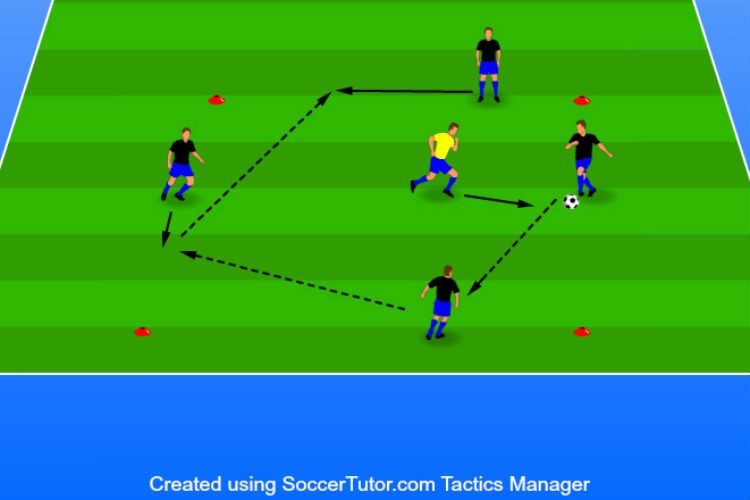
4-on-1 Keep Away
Description:
Four players move around inside the playing square attempting to complete as many passes as possible while one defender attempts to intercept or steal the ball.
Key Skill Focus: passing, receiving, ball control and decision making.
Age Suitability: U8 to U18 (see Variations section to increase the difficulty for older or more experienced players.)
Equipment: cones and soccer balls. Pennies are optional for the defenders.
Setup:
- Divide the team into groups of five players.
- Use four cones to mark a square playing grid for each group. The square should be 8-12 meters wide, but adjust the size according to age and skill level of the players.
- In each group, four players start as the offensive players and position themselves evenly along the four sides of the square.
- One player in each group starts as the defender in the middle of the square.
- One player on offense starts with the ball.
Instructions:
- The offensive players try to exchange as many passes as possible while moving along their designated lines. Offensive players are required to stay tight to their lines; one player on each line.
- After the offense has completed their first pass, the defender is allowed to move anywhere inside the square and attempt to intercept, or win, the ball from the offensive players.
- When the defender intercepts the ball from the offensive players, the defender switches positions with the offensive player who last touched the ball and a new possession begins.
- The drill continues in this manner for the determined time limit.
Variations:
4-on-2 – Add another defender and set up 4-on-2 game to make it harder for offense to exchange passes and keep possession.
Add players – Play 3-on-1, 5-on-2, or any combination needed to challenge the offensive and defensive players. Older, or more experienced players should start at 4-on-2 and play in a slightly smaller space if the quality is there.
Touch limit – to increase the difficulty, add a touch restriction for the offensive players. For example, 3-touch, 2-touch, or 1-touch for more advanced players.
Coaching Points:
- Vary the size of the grid, depending on the age and skill level of the players. A smaller playing area will increase the difficulty for the offensive players giving them less time on the ball, while a larger area will give the offensive players more time on the ball.
- Teach the players to move constantly and provide good passing angles for the player on the ball.
- Encourage the players to keep their eyes up in order to see the defender and make quicker decisions when the ball comes to them.
- Remind the players to communicate and help each other out with decision making on the ball.
- Challenge the defender to try and win the ball back as quickly as possible.
_____________________________________
Two Cone Two Touch Partner Passing
Description:
Players partner up with two cones and one soccer ball. The players receive the ball on one side of the cone, touching the ball across the backside of the cone, and passing the ball back to their partner for them to repeat the process.
Key Skill Focus: passing, receiving, and ball control.
Age Suitability: U7 to U15 (adjust the distance between players depending on the age and skill level).
Equipment: cones and soccer balls.
Setup:
- Players partner up, with one soccer ball for each pair.
- Set up two cones 5-10 meters apart for each pair of players. Increase, or decrease, the cone distance depending on the age and skill of the players. More experienced players should be passing 15-20 meters.
- Each player stands behind a cone and faces their partner standing behind the other cone.
Instructions:
- The player with the soccer ball starts the drill by passing the ball with their right foot, on the right side of the cones, to their partner.
- The partner receives the pass, behind their cone, with their left foot, and uses their first touch to push the ball to the other side of the cone. On their second touch, the player passes the ball back to their partner with their right foot.
- This anti-clockwise rotation continues for a determined number of passes or time.
- Once the determined time, or number of passes, is completed, players switch directions and go in a clockwise rotation. Players now pass with their left foot and receive with their right foot. See Variations section for more patterns.
Variations:
Receive with the outside of the foot – Anti-clockwise rotation is outside right foot receive and right foot pass. Clockwise rotation is outside left foot receive and left foot pass.
Receive and pass inside – Anti-clockwise rotation is inside right foot receive with a right foot pass. Clockwise rotation is inside left foot receive with a left foot pass.
Drag – Players drag the ball across the backside of their cones before passing the ball back.
Coaching Points:
- Challenge players to decrease the time from their first touch to their second touch. This will increase their speed of play.
- Encourage less skilled players to take more touches if they need. Have them focus on taking good touches and passes instead of the speed at which it is done.
- Remind players to focus when it comes to using their weaker foot as they may struggle at first. Keep reminding them it takes practice and to keep working on it.
- Stress that the players use the inside of their feet when passing.
__________________________________________________________________________________
Striking/Kicking Drills – Improve how you kick Ball
Fly Over-long distance kicking drill
The fly over drill aims to make players accurate at kicking long distances
- Make a large circle (10-20 m in diameter*) with cones
- Have players stand opposite their partner on opposite sides of the circle, outside the cones
- Each pair of players has one ball which the Kicking player kicks over the circle to their Receiving partner
- The Receiving partner attempts to catch the ball on the full
Power, Placement Precision Drill
Description:
Players form a line outside the penalty area while two players are designated as passers and position themselves on each side of the full-sized goal. One player at time a time will take a distance shot off their dribble, mid-range shot from a passer, and a final close range shot from the other passer.
Key Skill Focus: ball striking and finishing.
Age Suitability: U10 to U18.
Equipment: Cones, soccer balls, full-size goal and goalkeeper (optional).
Setup:
- Setup a full-size goal at one end of the field.
- One goalkeeper is needed in goal. If there are extra goalkeepers, position them outside of the goal and have them rotate in every 2-3 turns.
- Two players start as designated passers and position themselves on each side of the goal, about 5-6 meters off each goal post. Designate one passer as the mid-range passer and the other as the short-range passer.
- Set up a cone about 5-8 meters outside of the penalty box and have the remaining players form a line behind this cone.
- The soccer balls should be divided up evenly between the players in line and the two designated passers.
- The first player in line starts with a ball at their feet.
Instructions:
- The first player in line takes a touch towards goal and then shoots the ball from outside the penalty area.
- Immediately after the player takes their first shot, the mid-range passer completes a pass to the top of the penalty area for the shooter to run on to and finish in one touch.
- Immediately after the second shot, the short-range passer completes a pass to the outside of the 6-meter box for the shooter to run on to and finish in one touch.
- Once the shooter has completed all three shots, the shooter retrieves any soccer balls that went behind the goal while the goalkeeper retrieves any balls that are in the goal. The shooter then returns to the back of the line.
- Once the goalkeeper is set the next player in line can begin their turn.
- Once each player has gone through twice, rotate the designated passers, and collect any extra soccer balls.
- Continue for as many rounds as needed.
Variations:
Switch sides – Switch the sides of the short and mid-range passers so that players work on finishing from both angles.
Passer angles – Change up where the designated passers are positioned. Bring them off the end line and have them give passes from the sides of the box. This will force players to finish square passes rather than passes that are coming back to them.
Volleys and headers – Passers hand-toss balls in the air to the shooter. Shooters must decide if they are going to strike the ball out of the air with their foot, or head the ball. Shooters only get one touch still.
Vary the distance – Increase or decrease the distance depending on the players’ age and skill level.
Coaching Points:
- Encourage the players to shoot off the first touch every time, if possible.
- Educate the players on various shooting techniques. Their first shot from distance will probably need to be struck with their laces and more power. The mid and short-range shots are good opportunities for players to use the inside of their feet to redirect the ball and focus on accuracy to beat the goalkeeper.
- Players should take a quick glance up before shooting to see where the goalkeeper is positioned in front of the goal. This will allow players to make a better decision on the type of technique they should use to finish.
- Players should focus on keeping their eye on the ball when going to shoot. Their plant foot should be positioned next to the ball and a smooth swing with a locked ankle should strike through the ball.
- Remind players that since they are running on to the ball, they do not need such a powerful foot swing, but rather a clean smooth motion to redirect the ball into the goal. The players forward momentum will provide most of the power needed to finish the ball.
- Stress to the players to maintain a locked ankle position when striking the ball. This will ensure a more accurate shot and better finishing consistency.

__________________________________________________________________________________
Soccer Heading Drills – Improve how you head the Ball
Kneeling Header Drill
The kneeling header drill helps the soccer player develop confidence in heading the soccer ball and using their body to follow though on the heading action. Two People are required for this drill.
Instructions
- One player (Header) kneels on the ground with their arms by their side (the player who wishes to practice heading the ball)
- The second person (Thrower) stands about 3 meters away, facing the kneeling player
- The Thrower serves the ball in front of the Header player
- The Header player dives forward to head the ball on the hard part in the center of their forehead
- The Header player uses there whole body to follow though and ends up on their arms
Header Race 5 v 5
This drill improves players accuracy at heading the ball.
Instructions:
- Make two straight lines each with 5 players
- Stand the players in each line of 5 players 2 m apart
- On the signal to start, the first player in each line heads the ball to the 2nd player who then heads it to the third (etc, etc)
- The winning team is the one that is the first to successfully head the ball to the last player in their team
(Note: if the ball hits the ground it must be returned to the first person in the line, and the drill begins again)
__________________________________________________________________________________
Soccer Juggling Drills – Improve how you Juggle the Ball
Juggling with a tennis ball
Juggling with a tennis ball is much harder than juggling with a soccer ball. In fact, if you master jugging with a tennis ball, juggling with a soccer ball will be easy!

Instructions:
- Set 2 cones about 2 m apart
- Juggle the tennis ball while walking around the two cones
__________________________________________________________________________________